Tutorial
Creating an application
You can use two approaches when building a ttkbootstrap application. The first is familiar if you've used tkinter and ttk. The second uses a new Window class to simplify the whole process.
The traditional approach
This approach uses a familiar pattern. However, there are a few differences:
- import
ttkbootstrapinstead ofttk - use the
bootstyleparameter to add keywords instead of using thestyleparameter.
Constants are preferred
I prefer constants in the code over over strings. However, feel free to use a coding style that you feel comfortable with. The bootstyle keyword API is very flexible, so make sure you check out the syntax options.
import tkinter as tk
import ttkbootstrap as ttk
from ttkbootstrap.constants import *

root = tk.Tk()

b1 = ttk.Button(root, text="Button 1", bootstyle=SUCCESS)
b1.pack(side=LEFT, padx=5, pady=10)

b2 = ttk.Button(root, text="Button 2", bootstyle=(INFO, OUTLINE))
b2.pack(side=LEFT, padx=5, pady=10)

root.mainloop()
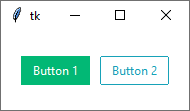
The code above will produce this window with two buttons.
A new approach
The same result can be produced by using the new Window
class, which you can read about in the API documentation. The difference may
seem small at first, but as you will see, the Window class uses parameters to
set many of the attributes and qualities that you can only set with methods
when using the Tk class. Additionally, the Style object is
automatically attached to the Window object as you will see in later
examples.
import ttkbootstrap as ttk
from ttkbootstrap.constants import *

root = ttk.Window()

b1 = ttk.Button(root, text="Button 1", bootstyle=SUCCESS)
b1.pack(side=LEFT, padx=5, pady=10)

b2 = ttk.Button(root, text="Button 2", bootstyle=(INFO, OUTLINE))
b2.pack(side=LEFT, padx=5, pady=10)

root.mainloop()
Choosing a theme
The default theme is litera, but you can start the application with any of
the built-in themes by using the Style object
independently or via the Window class.
import ttkbootstrap as ttk

# traditional approach
root = ttk.Tk()
style = ttk.Style("darkly")

# new approach
root = ttk.Window(themename="darkly")
Use themed widgets
ttkbootstrap widgets have dozens of predefined styles which are applied using keywords that modify both the type and color of the widget. The actual color values are defined for each theme.
For example, using the keyword outline would draw a button with an outline type, but using the keyword info would change the color of the outline and text.
Style Colors
The example below shows a button for every color.
import ttkbootstrap as ttk
from ttkbootstrap.constants import *

root = ttk.Window()

b1 = ttk.Button(root, text='primary', bootstyle=PRIMARY)
b1.pack(side=LEFT, padx=5, pady=5)

b2 = ttk.Button(root, text='secondary', bootstyle=SECONDARY)
b2.pack(side=LEFT, padx=5, pady=5)

b3 = ttk.Button(root, text='success', bootstyle=SUCCESS)
b3.pack(side=LEFT, padx=5, pady=5)

b4 = ttk.Button(root, text='info', bootstyle=INFO)
b4.pack(side=LEFT, padx=5, pady=5)

b5 = ttk.Button(root, text='warning', bootstyle=WARNING)
b5.pack(side=LEFT, padx=5, pady=5)

b6 = ttk.Button(root, text='danger', bootstyle=DANGER)
b6.pack(side=LEFT, padx=5, pady=5)

b7 = ttk.Button(root, text='light', bootstyle=LIGHT)
b7.pack(side=LEFT, padx=5, pady=5)

b8 = ttk.Button(root, text='dark', bootstyle=DARK)
b8.pack(side=LEFT, padx=5, pady=5)

root.mainloop()

I could have created those buttons in a simpler fashion by using the
Style.colors object, which contains a reference to all colors used in the
theme, and which is also an iterator.
As for the Style object, you can either create the style object using the
Style class, or use the style property on the Window object.
import ttkbootstrap as ttk
from ttkbootstrap.constants import *

root = ttk.Window()

for color in root.style.colors:
    b = ttk.Button(root, text=color, bootstyle=color)
    b.pack(side=LEFT, padx=5, pady=5)
Style Types
The keyword can control the type of widget that is presented. Consider the following example, which shows a solid and an outline button. They are both buttons, but of different types.
import ttkbootstrap as ttk
from ttkbootstrap.constants import *

root = ttk.Window()

b1 = ttk.Button(root, text="Solid Button", bootstyle=SUCCESS)
b1.pack(side=LEFT, padx=5, pady=10)

b2 = ttk.Button(root, text="Outline Button", bootstyle=(SUCCESS, OUTLINE))
b2.pack(side=LEFT, padx=5, pady=10)

root.mainloop()

Keyword usage
On final note on using keywords... the bootstyle parameter is VERY flexible.
It doesn't really matter how the keyword looks. There is a regex expression in
the background that parses the input and converts it into the appropriate ttk
style. You can pass in a string of keywords, or an iterable of keywords
such as with a list or tuple.
All of the following variations are legal and will result in the same style.
"info-outline""infooutline""info outline""outline-info"("info", "outline")(INFO, OUTLINE)
The recommended keyword separator is a dash
If using strings for keywords, it is recommended to separate the keywords using a dash when possible, as in the first example above.
If using constants, and you are using more than one keyword, you will use
a list or tuple as in the last example above.